Sunday 7 November 2010

Body Suit

I can sew. Kinda.
I can use patterns, mostly. I'm rubbish at developing patterns from measurements. I might have been successful in draping it on a mannequin, but didn't have one. I could have probably borrowed one from fashion, but it's horribly intimidating just walking in there and opted to just buy a pattern. Apparently, I found out later after I cut muslin for the mock-up we have some sort of mannequin in storage for showing items.

Anyway. Through my mild ignorance, I ordered the childrens' sized pattern. I thought through my technical skills learned at Moore for pattern-sizing I could easily do it. After struggling with technical measuring and drawing, I decided to just wing it, as I do.


Pile-o-patterns and cut muslin.

The sewn muslin jumpsuit.

 The jumpsuit sewn in the actual fur. Lain across Tedward's baseboard.

The Eyes

The eye design was developed from "follow me" eye tutorials used by many furry artists. Some youtube video tutorials:

Using a Watercolour Pallet - My design was based mostly on this method.
Using "Fun Foam" - I have used this method before, but felt it was unprofessional looking and has the tendency to make the heads look cross eyed front on.
Using Buckram and Loo-roll Tubes - I have used buckram before to base eyes off of, but used fun foam to line them.


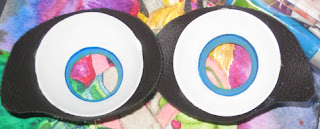
I made the base of the eyes by lathing then vac-forming chemi-wood.

My first set of eyes after painting them by hand. The black outside of the eye design is faux leather.

Saturday 23 October 2010

Building the Head

Firstly, I bought a polystyrene head and made a base to hold it; an aluminium pole allows the head to be easily rotated and picked up from the base. Using a bala clava for the base, upholstery/high-density foam is shaped and applied. The foam is drawn onto then cut with an electric carving knife. I used a scalpel and scissors to do finer cutting around the edges. Here is the progress so far:

After finishing the foam carving (more was added from previous shot), I made a pattern for the fur using muslin. After cutting the fur and roughly pinning it, with nose and eyes thrown on, it looks like this monstrosity:
Horrifying. Trimming the fur will make it a lot better.... Oh, and furring the ears, maybe.

Friday 15 October 2010

Componants

Amongst twiddling my thumbs waiting for materials to arrive, I sculpted a nose and four claws in plasticine. Looking for reference pictures was pretty awesome. Google image search for dog nose. So. Cute.


 The nose and claws were moulded in silicone, then cast in resin.


Once slippers arrived, I began to shape/foam them. Hooray!

For the mouth and paw pads, I will be running foam latex. Here, the plaster moulds:

What this is all about....

This blog will chronicle (hopefully) my work on a costume made for Poole Lighthouse's panto-production of Peter Pan. The brief was actually sent to our class and I signed myself up for the Nana costume. It is essentially a fursuit/mascot costume. I have agreed to make the full costume, something I have no experience doing. I have made fur gloves, tails, and heads before. This project will now give me a chance to make the body suit and feet. It will be the third head that I will have made. Third time's the charm, right?

Below is a clip of the image I was sent to base my costume on.
...and my turn-around illustration from it.

The suit is to be delivered to the client by November 29.